Understanding Time Switch
Time switches serve as indispensable tools, enabling users to automate the activation and deactivation of electrical circuits at designated moments throughout the day. Unlike conventional timer switches, which merely halt devices after a predetermined period of operation, they are engineered to synchronize with the clock, regulating the power supply accordingly. These switches find widespread application in tasks such as controlling outdoor illumination, governing the operation of swimming pool pumps, managing water heaters, and overseeing other apparatuses necessitating scheduled functionality.
In the realm of time switch, two primary categories prevail: mechanical and digital. The mechanical variant boasts a rotating mechanism completing a full cycle every 24 hours. Enclosed within this mechanism, on-off switches govern the current’s passage in accordance with the user’s configurations. In stark contrast, digital time switches rely on an integrated battery and clock system, permitting the programming of on-off sequences across the entire day. Remarkably, they even offer the flexibility of distinct cycles on various days of the week.
Regarding the installation process, mechanical time switches are integrated into a circuit much like a compact appliance, wherein incoming and outgoing cables are affixed to screw terminals. In contrast, digital time switches present a different approach. They can be wired in a manner akin to contemporary dimmer switches, with wire leads establishing direct connections to circuit wires via wire connectors.
Employing timer switches confers numerous advantages, encompassing energy conservation, convenience, and heightened security. Through the automated management of diverse devices, users have the capacity to curtail energy expenses and guarantee that lights and appliances are deactivated during periods of non-use. Furthermore, time switches can bolster security measures by generating the appearance of an inhabited residence even in the absence of residents.
To sum up, grasping the workings of timer switches holds paramount importance for homeowners seeking to automate their electrical appliances. Regardless of whether one opts for mechanical or digital switches, the capacity to regulate the timing of power distribution bestows a plethora of benefits in the realms of energy conservation, convenience, and security.
How Time Switches Work
Timer stand as ingenious contrivances, streamlining the task of activating and deactivating electrical circuits at designated intervals throughout the day. In stark contrast to timer switches, which merely cease operation after a predetermined duration, time switches meticulously monitor the current time, affording users the flexibility to tailor the power timetable to suit their specific requirements.
In the conventional context, switching time were analog instruments featuring rotating mechanisms that completed a full cycle every 24 hours. These mechanisms employed on-off switches to regulate the current flow based on user-defined configurations. While analog time switches still find application in specific scenarios, electronic digital time switches have gained prevalence. These digital counterparts operate via an integrated battery and clock system, enabling programmable on-off sequences multiple times throughout the day. Impressively, they even offer the capability for distinct cycles on varying days of the week.
In the case of mechanical time switches, the wiring process resembles that of a compact appliance circuit. The incoming electrical cable links to screw terminals on the switch, while the outgoing power cable is attached to the load terminals. Conversely, digital time switches can be wired akin to contemporary dimmer switches, with wire leads connecting to circuit wires through the use of wire connectors.
The switches present an array of advantages, ranging from energy conservation to heightened convenience. Through the automation of power schedules for devices like outdoor lighting, water pumps, and heating units, users can curtail energy expenses and exert enhanced command over their electrical systems. Thanks to their programmable capabilities and straightforward installation, time switches constitute a valuable enhancement to both residential and commercial settings.
To sum up, timer stand as indispensable devices, simplifying the task of activating and deactivating electrical circuits at designated intervals. Whether equipped with analog or digital mechanisms, these switches provide programmable capabilities and boast straightforward installation. Through the integration of time switches, users have the opportunity to conserve energy, elevate convenience, and exercise amplified authority over their electrical systems.
Types of Time Switches
In the realm of time-switching, a diverse array of types graces the market. Each variant comes with distinct attributes and advantages, affording users the opportunity to discover the optimal solution tailored to their precise requirements. Here, we delve into some of the prevailing types of timer switches:
Mechanical Time Switches
Mechanical Time Switches: These classic switches rely on a rotating mechanism to monitor time and manage on-off sequences. They find common use in scenarios involving outdoor lighting, swimming pool pumps, and other devices necessitating precise timing. Known for their dependability and robustness, mechanical time switches are aptly suited for demanding, high-stress applications.
Digital Time Switches
Digital Time Switches: Differing from their mechanical counterparts, digital time switches make use of electronic components and programmable features. They offer heightened flexibility and precision in configuring multiple on-off cycles throughout the day. Equipped with a digital display and an intuitive user interface, adjusting and programming the settings is a straightforward task. Digital time switches find frequent application in scenarios involving indoor lighting, heating systems, and various other electrical devices.
Astronomical Time Switches
Astronomical Time Switches: These cutting-edge time switches integrate astronomical programming, enabling automatic adjustments of on-off cycles in accordance with sunrise and sunset times. By harmonizing with natural daylight patterns, astronomical time switches offer energy-conscious operation and the ability to adapt to shifting seasons. They excel in applications such as outdoor lighting, landscape irrigation systems, and various tasks that demand precise timing.
Plug-In Time Switches
Plug-In Time Switches: For those seeking a portable and versatile option, plug-in time switches offer an ideal solution. These petite devices conveniently insert into a wall outlet, granting you the ability to manage the on-off cycles of connected devices. They prove to be invaluable for tasks such as controlling lamps, holiday decorations, and other compact appliances.
Programmable Time Switches
Programmable Time Switches: For individuals in need of more sophisticated scheduling options, programmable time switches provide the solution. These switches come equipped with customizable programming features, enabling you to establish distinct on-off cycles for specific days or weeks. They find widespread application in environments like commercial buildings, educational institutions, and industrial settings.
When selecting a time switch, it’s crucial to take into account the precise demands of your application and the degree of control and automation you seek. Given the extensive array of choices at your disposal, you can discover the ideal time switch to align with your requirements and enhance energy efficiency.
Installation of The Switches
Installing a timer switch is a relatively simple process that can be done by any DIY enthusiast. Whether you are wiring a mechanical timer switch or a digital timer switch, the steps are straightforward and easy to follow. Here is a step-by-step guide to help you with the installation process.
Prepare the Power Supply: Prior to commencing the installation, ensure to deactivate the power supply to the circuit where you intend to install the switch. This can be accomplished by either switching off the circuit breaker or extracting the fuse. Utilize a circuit tester to verify that the power has indeed been shut off before moving forward.
Establish the Ground Connection: Initiate the process by connecting the ground wires. Affix one extremity of a grounding pigtail wire to the green ground screw on the time switch. Subsequently, link the opposite end of the pigtail to both the incoming and outgoing circuit ground wires utilizing a wire connector (commonly known as a wire nut). Ensure that the ground wires are neatly tucked away from the terminal connections to avert any potential short circuits.
Connect the Neutral Wires: Moving forward, proceed to connect the neutral wires. Cut an 8-inch segment of white insulated wire to serve as a pigtail, and strip approximately 1/2 inch of insulation from both ends. Insert one exposed end of the pigtail into the neutral screw terminal on the switch and securely fasten the screw. Join the other end of the pigtail to both the incoming and outgoing white circuit wires, then secure them together using a wire connector (commonly known as a wire nut). Neatly tuck away any excess wire into the switch box.
Finalize the LINE Connection: At this stage, proceed to finalize the LINE connection. Strip approximately 1/2 inch of insulation from the black wire on the incoming cable, and insert this end into the screw terminal labeled LINE. Securely tighten the screw, and carefully bend any extra wire into the lower section of the box.
Finalize the LOAD Connection: Proceed to complete the LOAD connection. Strip approximately 1/2 inch of insulation from the black wire in the outgoing cable, and insert this end into the screw terminal labeled LOAD. Securely tighten the screw, and neatly tuck away any surplus wire into the lower section of the box.
Attach the Flash Shield: To ensure safety, they are equipped with a wire terminal flash shield. Slide the shield over the designated plastic tab and secure it in position. Confirm the proper installation by consulting the reference markings on the shield.
Adjust the Time: Lastly, configure the switch to display the accurate time of day and program the ON-OFF cycle to your preference. Adhere to the manufacturer’s provided instructions for adjusting time settings.
By adhering to these steps, you can effortlessly set up a switch and relish the ease of automated control over your electrical devices. Always remember to prioritize safety by deactivating the power supply before commencing the installation procedure.
Wiring a Mechanical Time Switch
Installing a mechanical time switch is a fairly straightforward task that can be accomplished by any DIY enthusiast. Prior to starting the installation, it’s crucial to confirm that the power to the circuit has been deactivated. This can be achieved by either flipping the circuit breaker or removing the fuse that supplies power to the circuit. Employ a circuit tester to verify that the power has indeed been shut off before proceeding.
To install a mechanical time switch, initiate by linking the ground wires. Fasten one extremity of a grounding pigtail wire to the green ground screw on the time switch, then join the opposite end of the pigtail to both the incoming and outgoing circuit ground wires using a wire connector.
Afterward, proceed to connect the neutral wires. Cut an 8-inch segment of white insulated wire to serve as a pigtail, and strip approximately 1/2 inch of insulation from both ends. Insert one exposed end of the pigtail into the neutral screw terminal on the switch and securely fasten the screw. Join the other end of the pigtail to both the incoming and outgoing white circuit wires, then secure them together using a wire connector (commonly known as a wire nut).
Conclude the line connection by removing approximately 1/2 inch of insulation from the black wire on the incoming cable. Insert the exposed end of this wire into the screw terminal labeled “LINE” and firmly tighten the screw. Gently bend any excess wire into the lower section of the switch box.
Likewise, strip approximately 1/2 inch of insulation from the black wire in the outgoing cable and insert it into the screw terminal labeled “LOAD.” Securely tighten the screw and neatly tuck away any surplus wire into the lower section of the box.
Last but not least, for safety precautions, proceed to install the wire terminal flash shield. This shield effortlessly slides over a designated plastic tab, offering an additional layer of protection in the event of a flash resulting from contact between hot, neutral, or ground wires.
After the wiring is successfully concluded, proceed to set the time on the switch in accordance with the manufacturer’s provided instructions. The on-off cycles can be fine-tuned using pegs or levers located on the switch. Always adhere to all safety protocols and, for intricate installations, seek guidance from a licensed electrician.
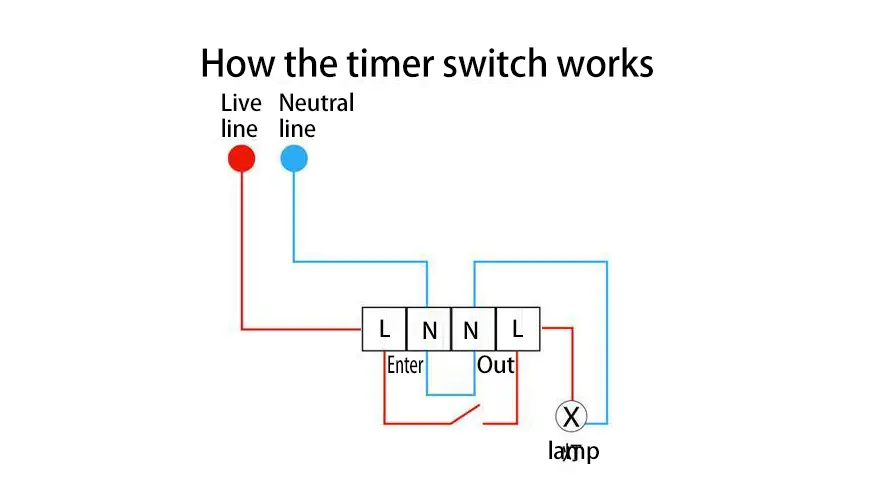
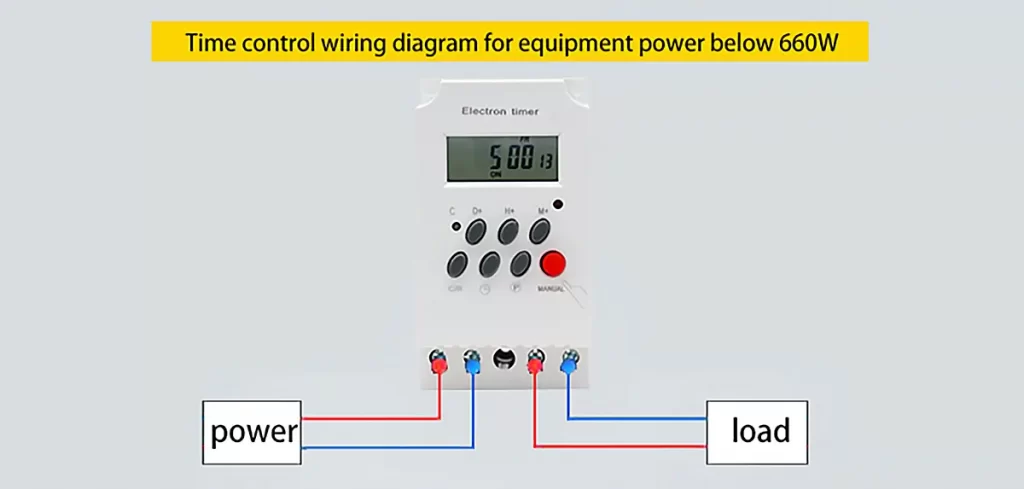
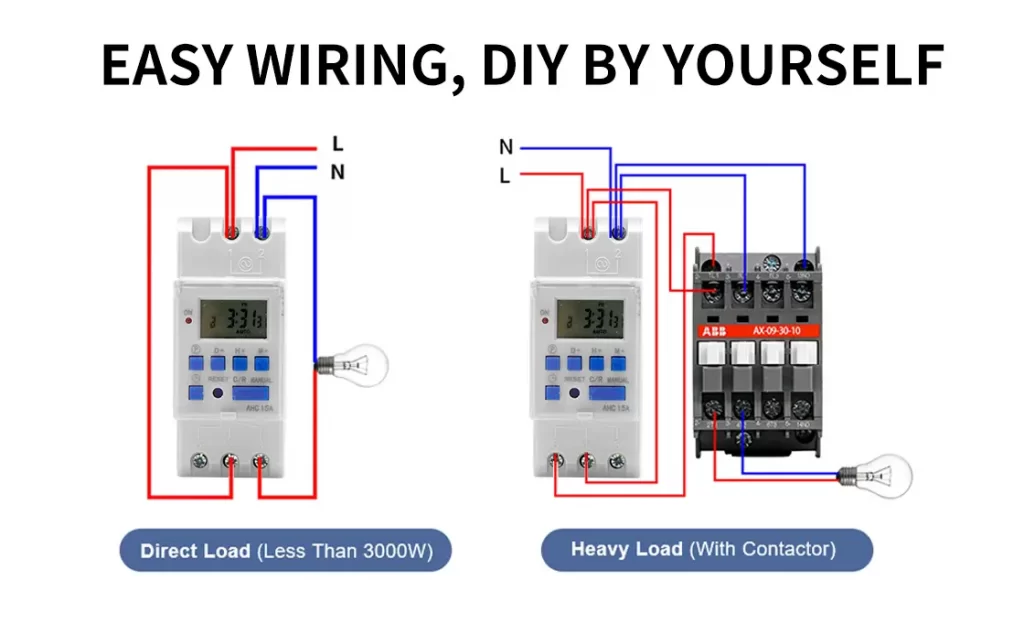
Wiring a Digital Time Switch
Setting up a digital time switch is a straightforward task well within the capabilities of any DIY enthusiast. These contemporary time switches offer programmable features and convenience, making them a favored choice for managing various devices in our homes. Whether you aim to automate your outdoor lighting or regulate your appliances’ operating schedules, a digital time switch can assist in achieving energy efficiency and optimizing your daily routines.
To initiate the installation, confirm that the power to the circuit has been deactivated by either flipping the circuit breaker or removing the fuse. Employ a circuit tester to double-check that the power is off before proceeding. Once you have securely disconnected the power, proceed to follow these steps for wiring a digital time switch:
Establish the ground connection: Fasten the green grounding wire on the switch to the circuit grounding wires using a wire connector. In case the switch is equipped with a grounding screw rather than a lead, employ a grounding pigtail to link it to the circuit grounding wires.
Establish the LINE connection: Join the black wire lead (designated as LINE) on the switch to the hot wire originating from the power source, utilizing a wire connector. If the switch employs screw terminals, connect the feed circuit wire to this screw.
Establish the LOAD connection: Link the blue or red wire lead on the switch (identified as LOAD) to the circuit’s hot wire that leads to the appliance or device.
Attach the neutral wire: Join the white wire lead on the switch (designated as the neutral) to the circuit’s neutral wire that enters and exits the time switch location. It’s important to bear in mind that the neutral wire is frequently required to ensure the timer remains powered up.
Finalize the installation: Neatly secure the wires within the switch box, gently press the switch into the wall box, and affix the mounting straps. Lastly, attach the cover plate and proceed to program the switch in accordance with the manufacturer’s provided instructions.
By adhering to these steps, you can proficiently wire a digital timer and relish the advantages of automated control over your devices. Always place safety as a top priority and, should you encounter any challenges or require additional expertise, do not hesitate to seek assistance from a licensed electrician.
Benefits of Using Time Switches
Using Switches provide a multitude of advantages, rendering them a valuable asset in both residential and commercial settings. Here are some of the benefits of utilizing time switches:

Energy Efficiency: Timer switches play a pivotal role in promoting energy conservation. By automating the activation and deactivation of electrical devices, they prevent unnecessary usage, thus reducing electricity consumption. This, in turn, leads to decreased utility expenses, ultimately contributing to a more energy-efficient environment.
Convenience: Timer switches eliminate the need for manual intervention in turning devices on and off at designated times. This level of convenience proves particularly valuable for outdoor lighting, irrigation systems, and other devices that require operation at specific intervals throughout the day.
Increased Security: They offer an additional level of security for both residences and businesses. Through the automatic activation of lights or other devices at predetermined intervals, they create the illusion of occupancy, acting as a deterrent to potential intruders. This added layer of security contributes to a safer environment.
Extended Lifespan: Swiching Time play a role in prolonging the lifespan of electrical devices by ensuring they are not left operating for prolonged durations. This proactive measure reduces wear and tear on the devices, helping to prevent issues like overheating or other potential damage. As a result, it contributes to the longevity and reliability of the equipment.
Flexibility: Digital time switches provide a higher degree of flexibility when compared to mechanical counterparts. They permit multiple on-off cycles throughout the day and can be programmed to accommodate various schedules for different days of the week. This heightened flexibility renders them particularly suitable for intricate scheduling requirements.
Cost Savings: A light switch timer can result in substantial cost savings over time. This is achieved through the reduction in energy consumption and the extended lifespan of devices. While there may be an initial investment associated with acquiring a time switch, the long-term benefits it offers often outweigh this initial cost.
In conclusion, time switches offer a myriad of benefits, including improved energy efficiency, added convenience, heightened security, prolonged device lifespan, enhanced flexibility, and significant cost savings. Incorporating time switches into your home or business not only elevates overall efficiency but also cultivates a more sustainable and economically savvy way of living.

Derek Ke
Hey, I’m Derek Ke, the founder of Moredaydc.com, an expert in solar electrical products and ev charging.
In the past 15 years, we have helped 60 countries and nearly 500 customers (such as farms, residences, industrial and commercial) solve new energy and green power problems. This article aims to share more knowledge about solar electricity and new energy with everyone, so that green electricity can enter every home.
Make Electricity Available To All People